How to Harvest Worm Castings Without Making a Mess
I mucked this up completely the first time — my harvest left the patio stained and half a dozen escapees looking for a new home behind the fridge. Harvesting worm castings is straightforward once you know the two rules: work in the shade, and never rush. Here is the exact method for getting that black gold without the mess.
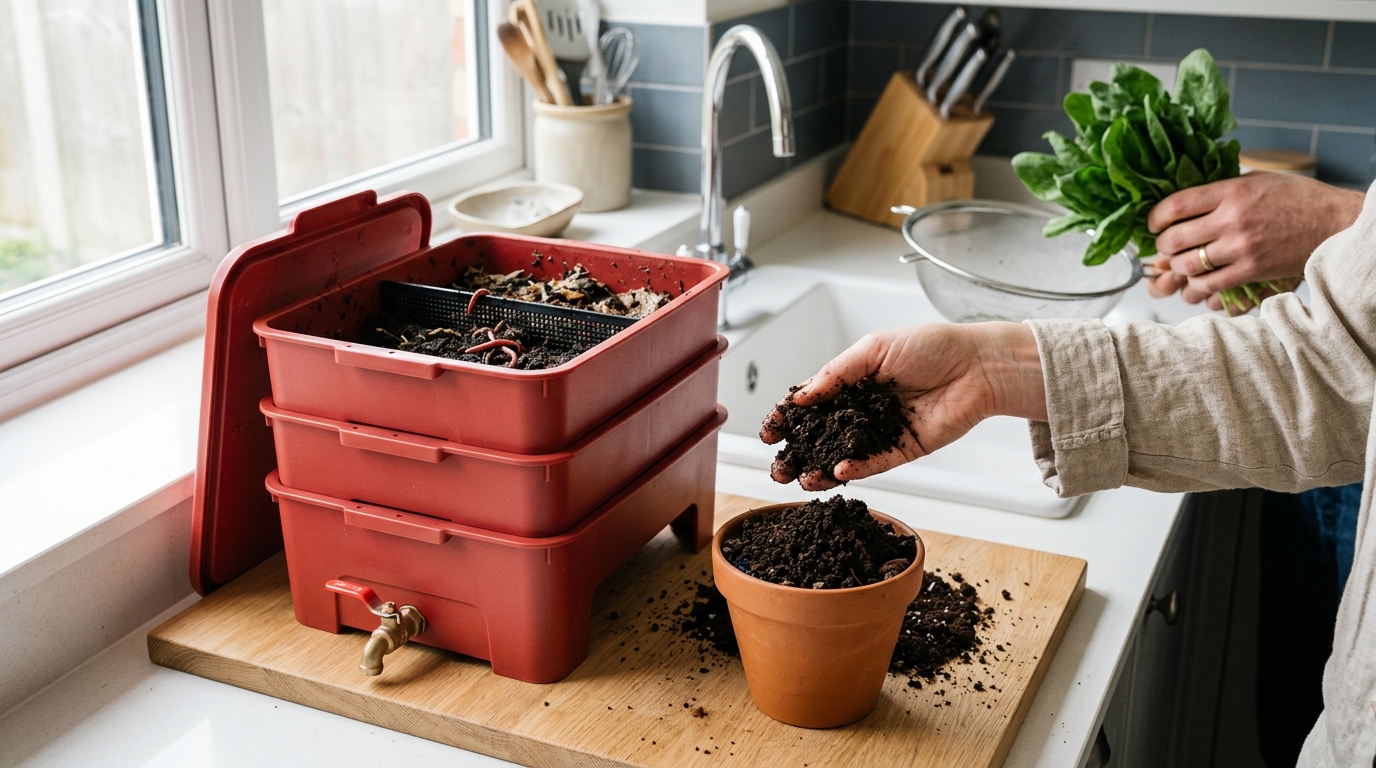
How do you harvest a multi-tray wormery without the mess?
To harvest a multi-tray wormery cleanly, stop feeding the active tray and add fresh food to an empty tray placed directly on top. The worms will naturally migrate upwards through the drainage holes to reach the new scraps. After 48 hours, you can simply lift off the top tray to access the worm-free castings left behind in the lower tier.
This works because worms instinctively move toward fresh food and away from their own processed waste. By setting up a new feeding zone, you coax them out of the finished compost without having to pick them out by hand. You do not need expensive equipment to do this, either. While I initially bought a fancy £20 stainless-steel sieve, a simple DIY funnel made from a cut-off two-litre plastic bottle or a sturdy kitchen colander works just as well. This gravity-led migration is spot on for popular UK stackable systems like those from Wiggly Wigglers or Original Organics. Let the worms do the heavy lifting, and you avoid the faff of manually sorting through sticky vermicast.
Setup checklist and process
- Place an empty tray on top of the full one. This will become the new feeding zone.
- Create drainage holes. Ensure there are holes in the bottom of the new tray (if you are DIYing it, poke a few holes with a drill or use a kitchen sieve) so the worms can pass through.
- Add a fresh layer of food scraps. Bait the top tray with fresh food and cover it with damp newspaper.
- Feed and wait. The worms are attracted to the new food and will crawl through the holes to the fresh supply.
- Swap trays. After 24 to 48 hours, the original tray will be mostly empty of worms. Slide the top tray off.
- Collect the treasure. The lower tray now holds mature vermicast that is ready for the garden.
If you are still hunting for the right system, check out our blog for guides that break down the pros and cons of the most popular multi-tray kits for flats and small spaces.
The “Light & Time” Lure (Best for Single Bins)
Not everyone has a stackable set-up. Single-bucket wormeries can still be harvested cleanly by exploiting the worms’ natural dislike of light.
- Stop feeding for 1–2 days. This empties the gut and reduces moisture that can make the bed sticky.
- Expose the bin to a bright lamp. A standard desk lamp works well. Place the light on one side of the open lid for about 30 minutes.
- Watch the worms dive. They will instinctively burrow away from the illumination, gathering safely at the bottom of the bin.
When the surface looks clear, gently scrape off the top centimetre of castings—that is the mature vermicast you want. Be careful not to leave the bin exposed to the light for longer than half an hour. The heat can dry out the worms, especially in a chilly British winter where indoor temperatures can dip below 10°C.
A common mistake I made was using a garden-type halogen floodlight, which nearly turned the bin into an oven. Stick to a low-wattage lamp and the worms will thank you.
Troubleshooting the Worm Tea Cleanup
What is worm tea? It is the nutrient-rich liquid that drips from the bottom of a full tray—essentially a concentrated byproduct of the composting process. It smells earthy, can be a bit sticky, and loves to spread if you are not prepared. According to the Royal Horticultural Society (RHS), liquid feeds from wormeries are potent and must be handled correctly to actually benefit your plants.
Preventing a mess
- Lay a shallow tray or a sheet of plastic under the wormery before you start any harvest. This catches any runoff before it reaches your kitchen floor.
- Keep a mop or a wet/dry vacuum handy for quick spill removal.
What NOT to do
- Don’t pour the tea straight down the sink—the organic load can clog pipes.
- Avoid dumping it on indoor plants without dilution; the high nitrogen can scorch leaves.
- Never store undiluted worm tea in a sealed jar; it will go anaerobic, ferment, and smell worse than a blocked drain.
Post‑Harvest Care: Settling the Worms
The harvest can be a bit of a shock for the worms, so give them a gentle reset.
- Feed a thin layer of moist newspaper or shredded cardboard for the first 24 hours. This provides a familiar, low-odour food source while the worms re-establish their burrows.
- Check moisture—the bedding should feel like a wrung-out sponge. Too dry and the worms will retreat; too wet and you will get that dreaded “tea” leak again.
- Avoid heavy foods (meat, dairy, oily bits) for the first few days. The worms need a calm period to settle into their new tray.
In winter, keep the bin away from draughty garages where temperatures can fall below 5°C. A simple insulated blanket or a cupboard in a heated room helps the worms stay active longer. As Garden Organic notes, worms slow down significantly in typical British winter temperatures, so a bit of basic insulation goes a long way.
Wormery Harvesting Methods
| Method | Best For | Time Required | Key Tool |
|---|---|---|---|
| Migration | Multi-tray systems | 24-48 hours | Empty tray |
| Light & Time | Single bins | 30-60 minutes | Desk lamp |
| Manual Sorting | Small batches | 15-30 minutes | Colander |
| Sieving | Fine castings | 10-20 minutes | Stainless steel sieve |
When to Harvest and How Much to Use
UK Harvest Calendar
| Season | Worm Activity | Best For | Avoid |
|---|---|---|---|
| Spring (Mar–May) | High | Full harvest, colony splitting | None |
| Summer (Jun–Aug) | Moderate to high | Light harvest, tea collection | Midday heat |
| Autumn (Sep–Nov) | Moderate | Full harvest before winter | Leaving tray empty |
| Winter (Dec–Feb) | Low | Minimal disturbance only | Any full harvest |
Build a £5 Sieve
You do not need a £20 stainless-steel sieve. A simple DIY version works perfectly:
- Materials: A plastic garden trug or washing-up bowl, a piece of 6 mm galvanised mesh (roughly £3 from B&Q or Screwfix), and a few cable ties.
- Method: Cut the mesh to fit across the bowl, secure with cable ties through drilled holes, and shake the castings through. The worms and larger chunks stay on top; the fine vermicast falls through.
- Tip: Work in the shade — direct sun stresses worms and dries out the castings.
Application Rates
- Raised beds: Sprinkle a 2–3 cm layer across the surface and fork in lightly. One full tray coats roughly 1 m².
- Pots and containers: Mix castings into the top 5 cm of compost at a ratio of 1 part castings to 4 parts potting mix.
- Seedlings: Use a thinner 1 cm top-dressing only after the first true leaves appear.
Your Next Step
Harvesting worm castings is a bit of a faff the first time, but once you have mastered the funnel or light lure, it becomes a routine part of your indoor composting. You will end up with nutrient-rich vermicast that turns a modest balcony pot into a tomato-producing powerhouse.
If you want a printable checklist to walk you through each step, grab a free Composting Starter Checklist online—it helps to have a dedicated harvest-day section to hand.
Got more questions or a tricky situation? Drop me a line on the contact page; I am always happy to help a neighbour avoid the same messes I made. You can also read more about my own early composting disasters on the about page. A good harvest is one of the most satisfying parts of keeping worms.
Related Guides
For a complete overview, see our How to Set Up a Wormery for the First Time UK.
Further Reading
Note: General guidance only, verify details with a qualified professional or official source.