Why Is My Wormery Smelling Bad UK? (And How to Fix It)
A smelly wormery is not normal. Full stop. If your bin smells like a sewer, something is actively dying — either the worms, the bedding, or both. The good news is that 95% of smelly wormeries are fixed with two simple changes.
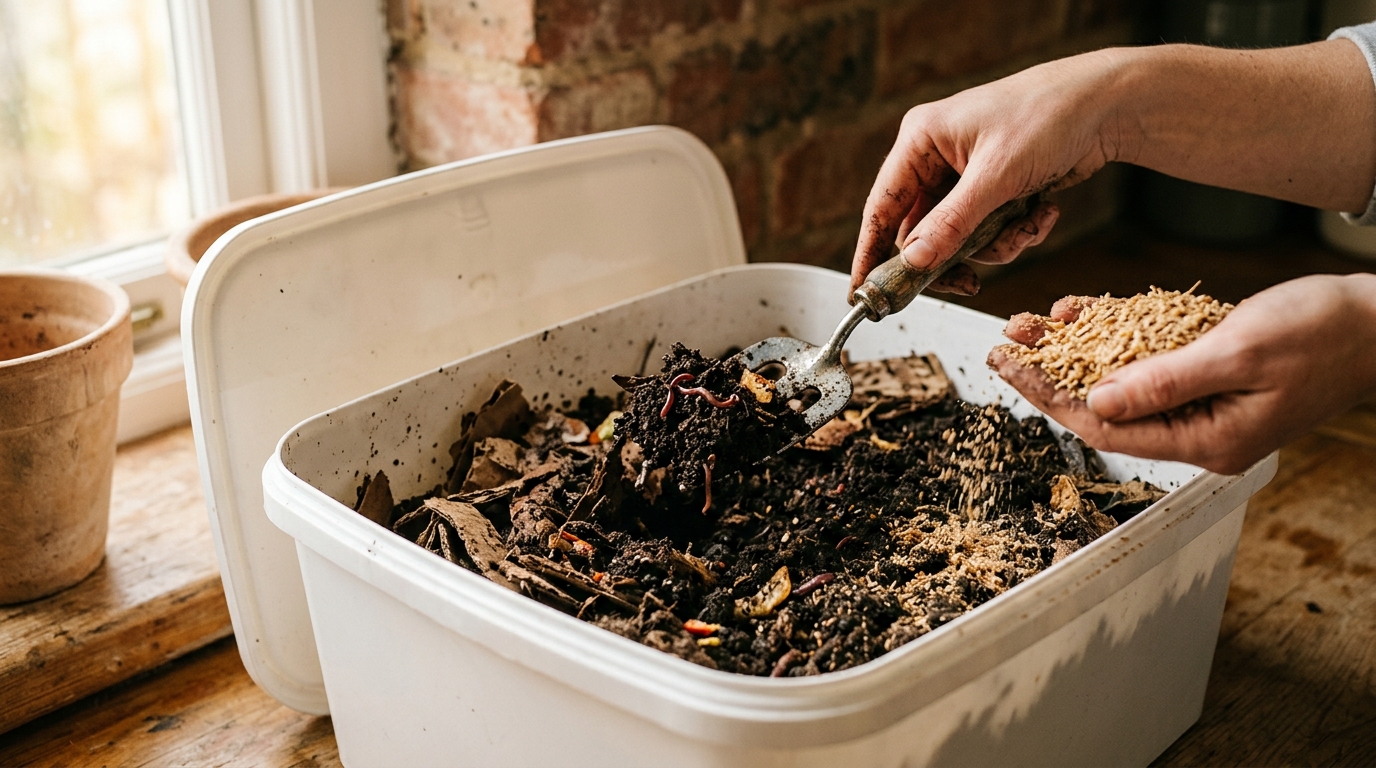
Quick win: A healthy wormery should smell like a damp woodland floor, not a sewer.
Download the Free Composting Starter Checklist to keep track of feeding, moisture, and aeration as you go.
Why Does My Wormery Smell Bad? (The Diagnostic Test)
Your wormery smells bad because it has gone anaerobic, usually due to excess moisture, overfeeding, or poor ventilation blocking oxygen from reaching the compost. Before you reach for the spray bottle, find out exactly which of these is going on.
Three Questions in 30 Seconds
1. The Squeeze Test – Grab a handful of bedding and give it a gentle squeeze.
- Too wet: It feels like a soaked sponge and a few drops trickle out. According to the Royal Horticultural Society (RHS), this means the bin is anaerobic and will produce that rotten-egg smell.
- Too dry: It crumbles into dust and falls apart. The worms will retreat, and the bin can start to smell sour as the few microbes left work overtime.
2. The Air Test – Take a quick sniff of the surface.
- Aerobic (good): Earthy, slightly sweet, reminiscent of a forest floor after rain.
- Anaerobic (bad): Sharp, vinegary, or like rotting cabbage. This points to a lack of oxygen, often caused by over-feeding or poor ventilation.
3. Visual Cues – Look at the castings and liquid.
- Healthy castings are dark, crumbly, and smell faintly earthy.
- Rotten mush is black, slimy, and clings to the sides. The liquid at the bottom (often called “worm tea”) should be clear to amber and smell earthy – a foul, brown runoff means rot.
If any of the above point to “wet” or “anaerobic”, you have identified the problem.
How Do I Fix a Smelly Wormery? (The “Big Three” Fixes)
You fix a smelly wormery by immediately introducing oxygen, soaking up excess water with dry carbon like shredded paper, and stopping all feeding for at least 48 hours. Once you know the cause, jump straight to these three actions. They are the exact steps I used to rescue my own setup after a fruit-fly invasion made the kitchen briefly uninhabitable last summer.
1. Aeration – The Oxygen Fix
Gently stir the contents with a clean garden fork or the handle of a broom. Work the top centimetre only – you do not want to mash the worms, just introduce air. According to Wiggly Wigglers, a quick 30-second stir every few days restores aerobic conditions and cuts the smell dramatically.
2. Moisture Balance – The Sponge Test
If the squeeze test showed excess water, sprinkle shredded newspaper, plain cardboard, or dry peat moss over the surface. These dry materials act like a sponge, soaking up surplus liquid. I once added a whole roll of toilet roll – the worms loved the extra carbon and the bin dried out within a day.
3. Feeding Ratios – The Volume Fix
Stop feeding for 48 hours while the bin processes the backlog. Over-feeding is the number one cause of bad smells. When you resume, add food in small, bite-size pieces and always bury it under at least 2 cm of bedding.
Do this right now to stop the rot:
- Stir the bin for 30 seconds.
- Toss a handful of shredded newspaper onto the surface.
- Pause feeding for two days, then resume with buried, chopped scraps.
Now that you have a clear rescue plan, you might want a handy reference to keep the fixes top-of-mind. Download the Free Composting Starter Checklist – it is a simple one-page sheet that reminds you when to stir, add dry bedding, and pause feeding.
UK-Specific Context: Winter & Ventilation
British winters are notorious for high indoor humidity, and a closed-up cupboard can become a perfect incubator for anaerobic conditions.
Here is how our weather impacts an indoor bin:
- Winter Dampness: Warm rooms generate condensation; the moisture settles in the wormery, making it easier for the bin to go “wet”. Garden Organic notes that indoor wormeries often need extra ventilation in months when indoor relative humidity climbs.
- Ventilation: Choose a wormery with drilled side trays or a mesh lid. If you are using a DIY bin, drill a few 1 cm holes in the sides and place the bin near a window (but not in direct sunlight – the sun can cook the worms). A drafty hallway works better than a sealed kitchen cupboard.
- Temperature: Worm activity slows below 10 °C. In a chilly flat, the bin may appear “stuck” and start to smell. Keep the bin in a spot that stays around 15 °C – a cupboard under the sink or a pantry works well.
Bottom line: In winter, aim for a drier, better-ventilated setup and be prepared to add a little extra dry bedding each week.
Prevention: How to Feed Correctly
Keeping the smell at bay is easier than fixing it after the fact. Here is the routine that has kept my flat-dweller wormery smelling sweet for three years.
Follow these feeding rules to prevent rot:
- Bury the Waste: Make a shallow trench (about 5 cm deep) in the bedding and drop the food scraps in, then cover. This keeps food hidden from flies and stops odours escaping.
- Chop the Waste: Smaller pieces decompose faster. A kitchen chopper or even a hand-knife does the trick – think pea-size bits.
- The “One Bin” Rule: You can only feed as fast as the worms can process. A good rule of thumb is the volume of food you add should never exceed the volume of existing castings. If the bin looks full, hold off feeding.
Here is a quick visual guide for feeding:
- Dig a small trench with a finger.
- Drop the chopped scraps in.
- Pat the bedding over the top.
Follow this each time you feed and the bin will stay aerobic, dry, and pleasantly earthy.
When the Smell Means Trouble: The “Sad Tale” Scenario
Sometimes the smell is a symptom of something worse – dead worms. It is a gut-punch, but you can still salvage the system. I have documented a few of my own spectacular failures over on the blog, so do not beat yourself up if this happens.
Look out for these signs of a dying bin:
- Worms that are swollen, blackened, or have a slimy coating.
- Worms floating on the surface of the liquid.
- A persistent, foul odour despite aeration and drying attempts.
Decision time: If you see more than a handful of dead worms and the bin still smells like a sewage pipe, it is probably time to restart.
Follow this restart protocol:
- Empty the bin – Scoop out all bedding and castings into a bucket.
- Clean the container – Rinse with warm water and a splash of vinegar; avoid bleach (it kills the beneficial microbes).
- Refresh the bedding – Add new shredded newspaper, cardboard, and a handful of peat moss.
- Re-introduce worms – Order a fresh batch from a reputable UK supplier – see my favourite list at Where to Buy Worms UK.
- Start slow – Feed only a tiny amount of food for the first week and monitor moisture and smell.
A quick checklist for restarting:
- Bin cleaned and rinsed?
- Fresh dry bedding added?
- New worms introduced?
- Feeding paused for 48 hours?
If you tick all the boxes, you are back on track. It feels a bit like a fresh start, and the worms will be happy again.
Emergency 24-Hour Smell Fix
If the smell is unbearable and you need it gone today, follow this protocol exactly:
- Stop feeding immediately. Do not add anything new.
- Stir the top 5 cm vigorously with a fork for 60 seconds to introduce oxygen.
- Add two handfuls of dry shredded newspaper and mix it in.
- Leave the lid slightly ajar for 30 minutes to vent excess gas.
- Close the lid and do not open again for 24 hours.
- Check the smell tomorrow. If it still reeks, repeat steps 2–3 and add a third handful of dry bedding.
Smell Decoder
Match the odour to the likely culprit:
| Smell | Likely UK Food Culprit | What It Means |
|---|---|---|
| Rotten cabbage / sulphur | Onions, garlic, brassica stalks | Too much green waste, anaerobic |
| Sharp ammonia | Citrus peels, coffee grounds | Nitrogen overload, needs carbon |
| Vinegar | Fruit scraps, tomato skins | Normal but excessive fermentation |
| Sewage | Meat, dairy, oily foods | Rot has set in, restart likely |
Harvest or Restart?
Harvest or Restart?
Harvest if:
- The worms are active and moving normally.
- The smell improves after 24 hours of no feeding.
- Only the top layer is wet; the bottom is still crumbly.
Restart if:
- More than a dozen worms are dead or floating.
- The smell persists after 72 hours of drying and aeration.
- The entire bin is black, slimy, and clumped together.

Keep Learning
Bad smells are almost always a symptom of moisture, airflow, or feeding issues – and they are all fixable with a bit of aeration, the right amount of dry bedding, and a short feeding pause. Start with the “Big Three” fixes, then adopt the feeding routine that keeps your bin aerobic and dry.
If you are still struggling after trying these steps, feel free to get in touch and I will try to help you troubleshoot.
If you have got the basics sorted and want a quick reference to stay on track, download the Free Composting Starter Checklist – it is a handy one-page cheat sheet that reminds you when to stir, add dry material, and hold off feeding.
Follow the steps, keep an eye on moisture and smell, and your wormery will be back to that pleasant, damp-forest scent in no time. Your worms will thank you for the fresh bedding.
Related Guides
For a complete overview, see our Bokashi and Wormery Troubleshooting UK: Fixing Common Problems.
Where I Learned This
- Royal Horticultural Society (RHS) - Composting advice
- Garden Organic - Wormery management
Note: The information provided is for general guidance only. Always verify specific details with a qualified professional or official source.